Showing posts with label craft project. Show all posts

Friday, January 11, 2019

Stash Busting

Another round of stash busting. We have our Great Agers program this week at the church. It's a monthly event hosted by our church, which brings together community members for lunch, social time and entertainment. I've been frequently asked to provide treat boxes/items for our guest. It's right up my alley. This year I'm partnering with a friend to plan and assemble the monthly treat items, a big bonus because over time the program has grown to include up to 40 guests.

This month's theme is winter...of course. Even though the temperatures have been fluctuating and have even hit close to 50 degrees we figured you can never go wrong with cookies, hot chocolate mix, and cute snowmen.


 The snowmen were print & cut from my Silhouette library as were the phrases. I only needed to add to the mix as I already had a lot of the items in my stash. Glitter snowflakes I bought from WalMart years ago. Colors for the treat boxes was dictated by what I had on hand...blue, teal, pink, red and green.

Friday, September 7, 2018

Stash Busting Part II

As you know, I'm diligently attempting to reduce my Halloween stash. I managed to complete little more than half the tags needed for my project on Monday using old stickers, frames, and papers.  Had a lot of fun just playing and not overthinking placement or combinations. Each tag is unique. Since I often make a large number of favors for an event, the freedom from repetition is a bonus.

A few more images to share. Today promises to be another rainy day so I'm hoping to complete the remaining tags and then share the final packaging.


Monday, September 3, 2018

Stash Busting

It's a rainy, dreary day in this part of the country so today I'm spending time in the craft room prepping for Halloween. I usually don't create a lot of Halloween items, though it hasn't stopped me from collecting a lot of themed items over the years. A few cards and a few treat bags for the kids is the norm and typically in a mad dash at the end of October.  This year volunteered to provide the treat bags for the Great Agers luncheon so I need to prep 36 treat bags. Good motivation to begin early and to make a hefty dent into my stash.

Here are a few peaks of the tags I'm creating. More to come.


Saturday, February 9, 2013

Valentine Treat Bags

A few quick treat bags made with glassine bags and some valentine doodads I've collected over the years. The brads were picked up at Walmart recently and on sale no less.


Saturday, December 8, 2012

Penguin Lifesavers

I've made snowmen lifesavers for a number of years so it was time to change it up a bit. I created a penguin wrap, made about a dozen penguins and then lost the file, 'cause I'm smart that way. Thankfully I'd created enough to place at each place setting for our holiday dinner. I did end up changing it up a bit more by replacing some of the top hats with snow hats made from knit gloves, glued a pom pom on top and replaced the bow tie with a scarf. Much faster. Honestly, the top hats, though very cute, were a bit of a pain.


Tuesday, December 4, 2012

Bah Humbug

I had some tootsie pops remaining from Halloween so I decided to get crafty. I'd seen the posts on Pinterest showing spiders made from suckers. Way cool though not exactly merry and good cheer for this time of year. I put my brain to work, rummaged through my stash and came up with...the Bah Humbug. They were a bit of extra work but I think they'll be a hit with my group.


Thursday, November 15, 2012

Giving Thanks

I like to have something festive at each place setting when I host the family for Thanksgiving. Last year I made these treat bags using glassine bags and stamps from Papertry Ink. Not exactly sure what I'm going to put together this year. I've seen lots of great ideas on Pinterest and my brain is still stewing ideas. It had better land on something quick and given the time frame, something easy.

Tuesday, November 13, 2012

Halloween Treat Bag

As usual I'm a bit behind in posting halloween crafts. Less activity on the craft front this year because the majority of our kids are beyond the trick or treat age. All in all this is not a bad thing since this time of year kicks off my busiest time.

I did manage to do a quick treat bag for my youngest niece. I fell in love with tissue garland earlier in the year and finally found an oline source that wasn't going to break the bank so I purchase garlands in lots of different colors. I used a yellow gift bag from my stash and a hot glue gun to attach the orange and black garland around the top. Some old paper from my scrap pile, spider web border punch, a LD ghost cut and I was good. I think the entire project took me about a half hour and the majority of that time was spent wrestling with the glue gun.

Monday, February 14, 2011

At the Speed of Light

That's how quickly I felt time zip by me this past month. Lately there's always something on the agenda so I'm spending more time in the craft room and very little time online. Not a bad thing.

So what do you do with 12 boxes of left over chocolate Hershey bars from our Christmas crafts? Well if you're my nephew then you try to convince me to hand over a box...or two or three. Believe me I'm not that hard to convince. I don't need the extra sugar and in reality, though he can afford it, neither does he. Lucky for me (us) Mom came to the rescue with a plan to kick off fund raising for the Youth Group. The kids are planning to attend APS (Appalachia Service Project) this summer. They don't get to attend every year as it takes quite a bit of planning, coordination and cash; perfect opportunity for us to help out and at the same time get rid of the mounds of chocolate bars. We connected with the Youth Pastor and then Mom and I spent a weekend crafting for an impromptu Valentine Bazaar. What started with Hershey bars quickly morphed into a "few" additional items when the LD (Lettering Delight) email landed in my inbox. Come on...how was I suppose to resist these?

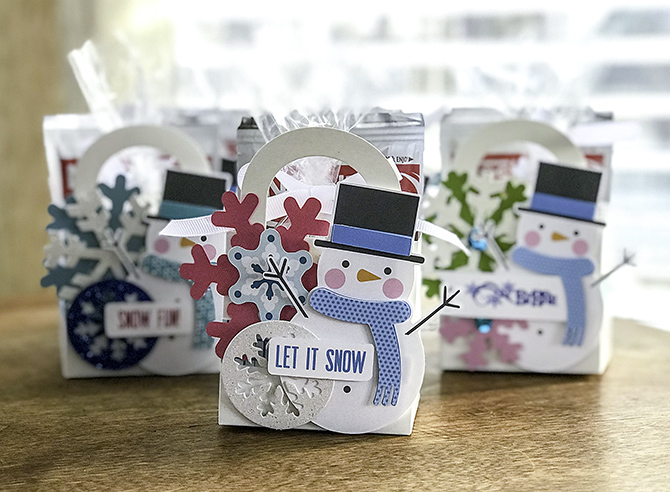
I did a slight modification for the bazaar. The pinch box is cute but a bit time consuming for mass production on a schedule. Instead I filled a small glassine bags with Hershey Hugs and Kisses and attached the bag to the back with a couple of staples. They were a BIG hit and held up well even with some handling. If I were to make these again, especially for a bazaar, I'd double the card stock on the body pieces to provide extra stability. Don't want to put all this work in and then have an arm or tail tear when they're being handled.

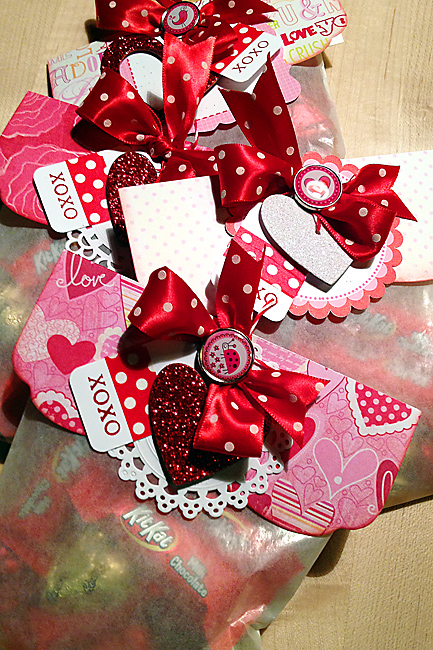
A photo of our puny valentine Hershey bars. And yeah, the monster has a bit of Yoda going on. We used papers from the K&Company valentine stack and mainly designs from my Cricut library.
And since we were on a roll we also made a bunch of sucker flowers. These actually went to a single buyer who bought the entire bucket. When all was said and done we collected a little over $150 for the Youth Group. A small drop in the bucket compared to the amount the youth will need to raise but not a bad start for the fund.

Friday, October 29, 2010

Note This

Just a quick post tonight with a sample of some note pads. The template and note pads came from Papertrey. They were quick and easy to make and best of all, a big seller at the bazaar. It's always nice when the effort you place into an item is snatched up quickly to be enjoyed by others.
I'm undecided at the moment if I'm going to create more this year. On one hand I have a number of note pads left in my stash and this year the ability to cut the covers with my Cricut, unlike last year when I cut each by hand. On the other hand I purchased a number of the little composition books when I found them on sale and they're even quicker to complete.
I've already made several as stocking stuffers for the teens in our family. My Basic Grey stash comes in perfect here since graphic and urban is definitely more in line with their sense of style.
I used rub-ons and some adhesive backed vellum for the wording. The vellum has been sitting in my stash since...ummm... late 90's?! Yikes. About time I put these sheets to use and I can count myself lucky to find the adhesive still very sticky.

Thursday, October 28, 2010

just chillin'...

We had a little burst of summer this past weekend; sunshine and temps in the mid 70’s? Since then the temps have been dropping steadily and it feels like Fall with Winter close on its heels. That's okay. Perfect weather for getting my mind set back into holiday crafting. Good thing too. Despite my goal to wrap up my bazaar projects this month I can already tell it will run into next month.

I was browsing my photo library and came across these projects I created last year. Why I didn't take photos of the contents I have no idea but at least I have a couple completed shots to share. The first is a Cocoa box set. The box I found at Michaels. After I made these I found several blogs with various treatments. Most have a wrap around but I like covering the entire box. I start by staining the box with walnut ink and then cover the outside with decorative paper. Inside I tucked 2 packets of cocoa wrapped in the same paper, a small bag of marshmallows, a little treat bag of Hershey kisses and a couple candy canes.
A tag and bow for the handle and because I needed a bit of sparkle...I added a wooden snowflake enhanced with glitter. They were a big hit. I have a few of these boxes left so maybe I make some for this year too.

Another bazaar project; this one for all those special teachers. I used Papertrey's Teacher's Apple. This is one of my favorite sets. It's so versatile; I find myself pulling it out a lot and not just for teacher related projects.

The box housed 10 note cards and envelopes. The candle was purchased at Wal-Mart for just a dollar. I used Juicy Apple but Warm Apple Pie also smells heavenly. To save time I stamped the apples onto a solid adhesive backed label sheet, trimmed the strips and wrapped the jar. Love simple. In fact they were so easy and quick I made several extras to tuck into holiday baskets I gave to family and friends.

Friday, September 17, 2010

Apples

Another find during my recent clean up. Like the pumpkins these apples were tucked away in one of my many craft boxes. I stained the base with walnut ink and once dry covered them with some scraps I had saved from a recent layout. Since I mainly scrap 8.5" x 11" I have bins full of paper trimming and am always happy when I can put my bits and pieces to good use.

I embellished them with leaves punched from an ek success then added a homemade button and some ribbon trim. The apples have a hole to string ribbon or twine for hanging but have a base thick enough to stand on their own. And I think for the moment, that's how I'll leave them.
And since I was hitting my scrap bin I decided to continue with my apples theme and punched a bunch using my MS apple punch.

I layered the cuts to get the stem and leaf detail. So much easier than trying to work with tiny pieces that never seem to want to stay put. I also like the added thickness which gives them a little depth and makes them sturdy like a thin chipboard. Perfect for use on a card or embellishing a harvest layout.

Thursday, September 16, 2010

The Yang

So I got side tracked. It started with a little straightening and ended up with a full cleaning and organization binge of my scrap room. It was long over due. I'm messy. Okay, understatement. I'm a very messy crafter & scrapper. Once I get into a project all kinds of things come out of the bins, boxes and cubby holes and take up residence on my scrap table. Before you know it I'm working in a 5"x5" space. And while I craft messy my creative motivation requires a clean, clutter free zone to fully function. The ying and the yang in constant battle. The yang is a hard task master but there are benefits...like these 2 wooden pumpkins.

I can't say for sure how long they've languished in one of my cupboards but it's safe to it's been awhile; definitely time to rescue them, dress 'em up and place them on display. I stained them brown using some old walnut ink then used my favorite Making Memories Halloween line from a couple years back to cover the base. A little inking around the edges, embossing to bring out the detail and some crinkle ribbon to complete the project. Perfect for a kitchen window or maybe hanging from a drawer pull.